Use AttributesView Control
AttributesView control is the most versatile component of NodeActa's built-in user interface. You can use AttributesView to display a single value or as many values as you want. AttributesView serves as universal edit box. It will display TextBox, NumberBox, DateTyme Picker, CheckBox, Image, RichTextBox, Label, HyperLink, etc by detecting the type of underlying value. You can also force the editor type.
The true power of AttributesView comes into play when you need to display more than one value. It shines especially when you need to display hundreds or thousands of values at once. Building a page layout with too many controls will make it extremely slow. On the other hand, displaying thousands of values within a single AttributesView doesn't make much of a difference in performance compared to displaying a dozen or so. A good example is a built-in app for Localization. There we use a single AttributesView to display thousands TextBoxes at once quite efficiently. Also, you can see how to use AttributesView in Samples->UI Controls Sample app.
To initialize an AttributesView you have to set AttributesView.source property. Value can be a record, attributes, or simple values.
Initialize With Attributes
Using one or more Attributes is the most flexibile way you can use AttributesView. You can build very complex layouts using Attribute, AttributeButton, AttributeHorizontalSplit, AttributeImage, AttributePanel, AttributeSheet, AttributeSpace and AttributeText.
Simple AttributesView
this.currencyEditor = new AttributesView(myPage);
this.currencyEditor.width = '200';   // 100 pixels width
this.currencyEditor.height = '1ch';  // 1 character height as we are displaying a single value
this.currencyEditor.source = new Attribute( {
    type: AttributeValueType.Currency,
    formatDisplay: '$ ,0.00',
    value: 55.90
} );
// to read attribute value do
let val = this.currencyEditor.source.value;
// to change attribute value do
this.currencyEditor.source.value = 33.49;
Complex AttributesView
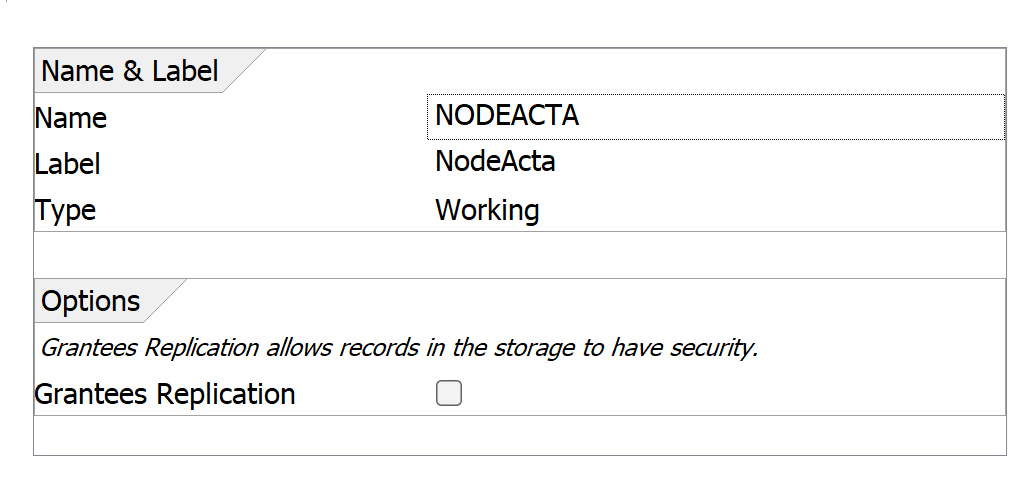
var myName = 'NODEACTA';
var myLabel = 'NodeActa';
var myType = 'W';
var myReplication = false;
...
this.attributesView = new AttributesView(myPage);
this.attributesView.options.labelsWidth = '15ch';
this.attributesView.source = [
    new AttributePanel( { caption: 'Name & Label' }, [
        new Attribute( {
            label: L`Name`,
            value: (atr)=> myName,
            setValue: (atr, val)=> myName = val } ),
        new Attribute( {
            label: L`Label`,
            value: (atr)=> myLabel,
            setValue: (atr, val)=> myLabel = val } ),
        new Attribute( {
            label: L`Type`,
            value: (atr)=> myType,
            setValue: (atr, val)=> myType = val,
            values: [
                new AttributeValue('W', 'Working'),
                new AttributeValue('A', 'Archive'),
                new AttributeValue('B', 'Backup')
            ] } )
    ]),
    new AttributeSpace(),
    new AttributePanel( { caption : L`Options` }, [
        new AttributeText( {
            label: L`Grantees Replication allows records in the storage to have security.`,
            font: { size: 8, style: { italic: true } } } ),
        new Attribute( {
            label: L`Grantees Replication`,
            type: AttributeValueType.Boolean,
            value: (atr)=> myReplication,
            setValue: (atr, val)=> myReplication = val } )
    ] )
];
Tree AttributesView
AttributesView can also display a tree like structure.
this.attributesView.options.buttonsAlwaysVisible = true; // commands buttons are always visible
                                                         // not just on focus
this.attributesView.source = [
    new Attribute( {
        label: 'Level 1',
        value: 'I am root',
        expanded: true,
        subattributes: [
            new Attribute( {
                label: 'Level 2',
                value: 'I am a child',
                expanded: true,
                subattributes: [
                    new Attribute( {
                        label: 'Level 3',
                        value: 'I am a grandchild 1',
                        commands: [
                            { label: 'command 1', icon: Icons.play, command: (a)=> alert(a.value) }
                        ]
                    } ),
                    new Attribute( {
                        label: 'Level 3',
                        value: 'I am a grandchild 2',
                        commands: [
                            { label: 'command 12', icon: Icons.delete, command: (a)=> alert(a.value) }
                        ]
                    } )
                ]
            } )
        ]
    } )
];

Attribute.subattributes can also be populated dynamically on parent attribute expansion.
this.attributesView.source = [
        new Attribute( {
            label: 'Level 1',
            value: 'I am static root',
            subattributes: (atr)=> {
                // you can check atr.value and decide what to return
                return <array of Attributes>;
            }
        } )
    ];
Initialize With Record
In NodeActa you will usually have your data in the form of a certain document class record. If you initialize the source property with a record, AttributesView will try the following:
- Check if you initialized
AttributesView.fieldsproperty. Control will display only listed fields from the record. - Check if you initialized
AttributesView.layoutproperty. Control will use this property to construct control's layout and find matching record field values to display in that layout. YourAttribute.nameproperty must match record's field or field name. - Check if record's data class has a defined Layout. If layout exists, the control will use it.
- If
layoutandfieldsproperties are not set and data class does not have layout defined, AttributesView will display all record's fields withAttributeflag in itsVisibilityproperty (seeDefault Visibilityoption in Class Designer).
If you want to display a single value for example, before setting source property, you must initialize layout or fields property like this:
let purchases = await Purchase.where(...some condition...).selectAsync();
let purchase = purchases[9];
...
this.attributesView.fields = [Purchase.customer];
this.attributesView.source = purchase;
...
const nameAndPlace = {
  type: AttributeValueType.String,
  value: (p) => {
    return p.name + ' ' + p.place;
  }
};

this.attributesView.fields = [nameAndPlace];
this.attributesView.source = purchase;
Hint
See Attribute for all possible properties nameAndPlace can have.
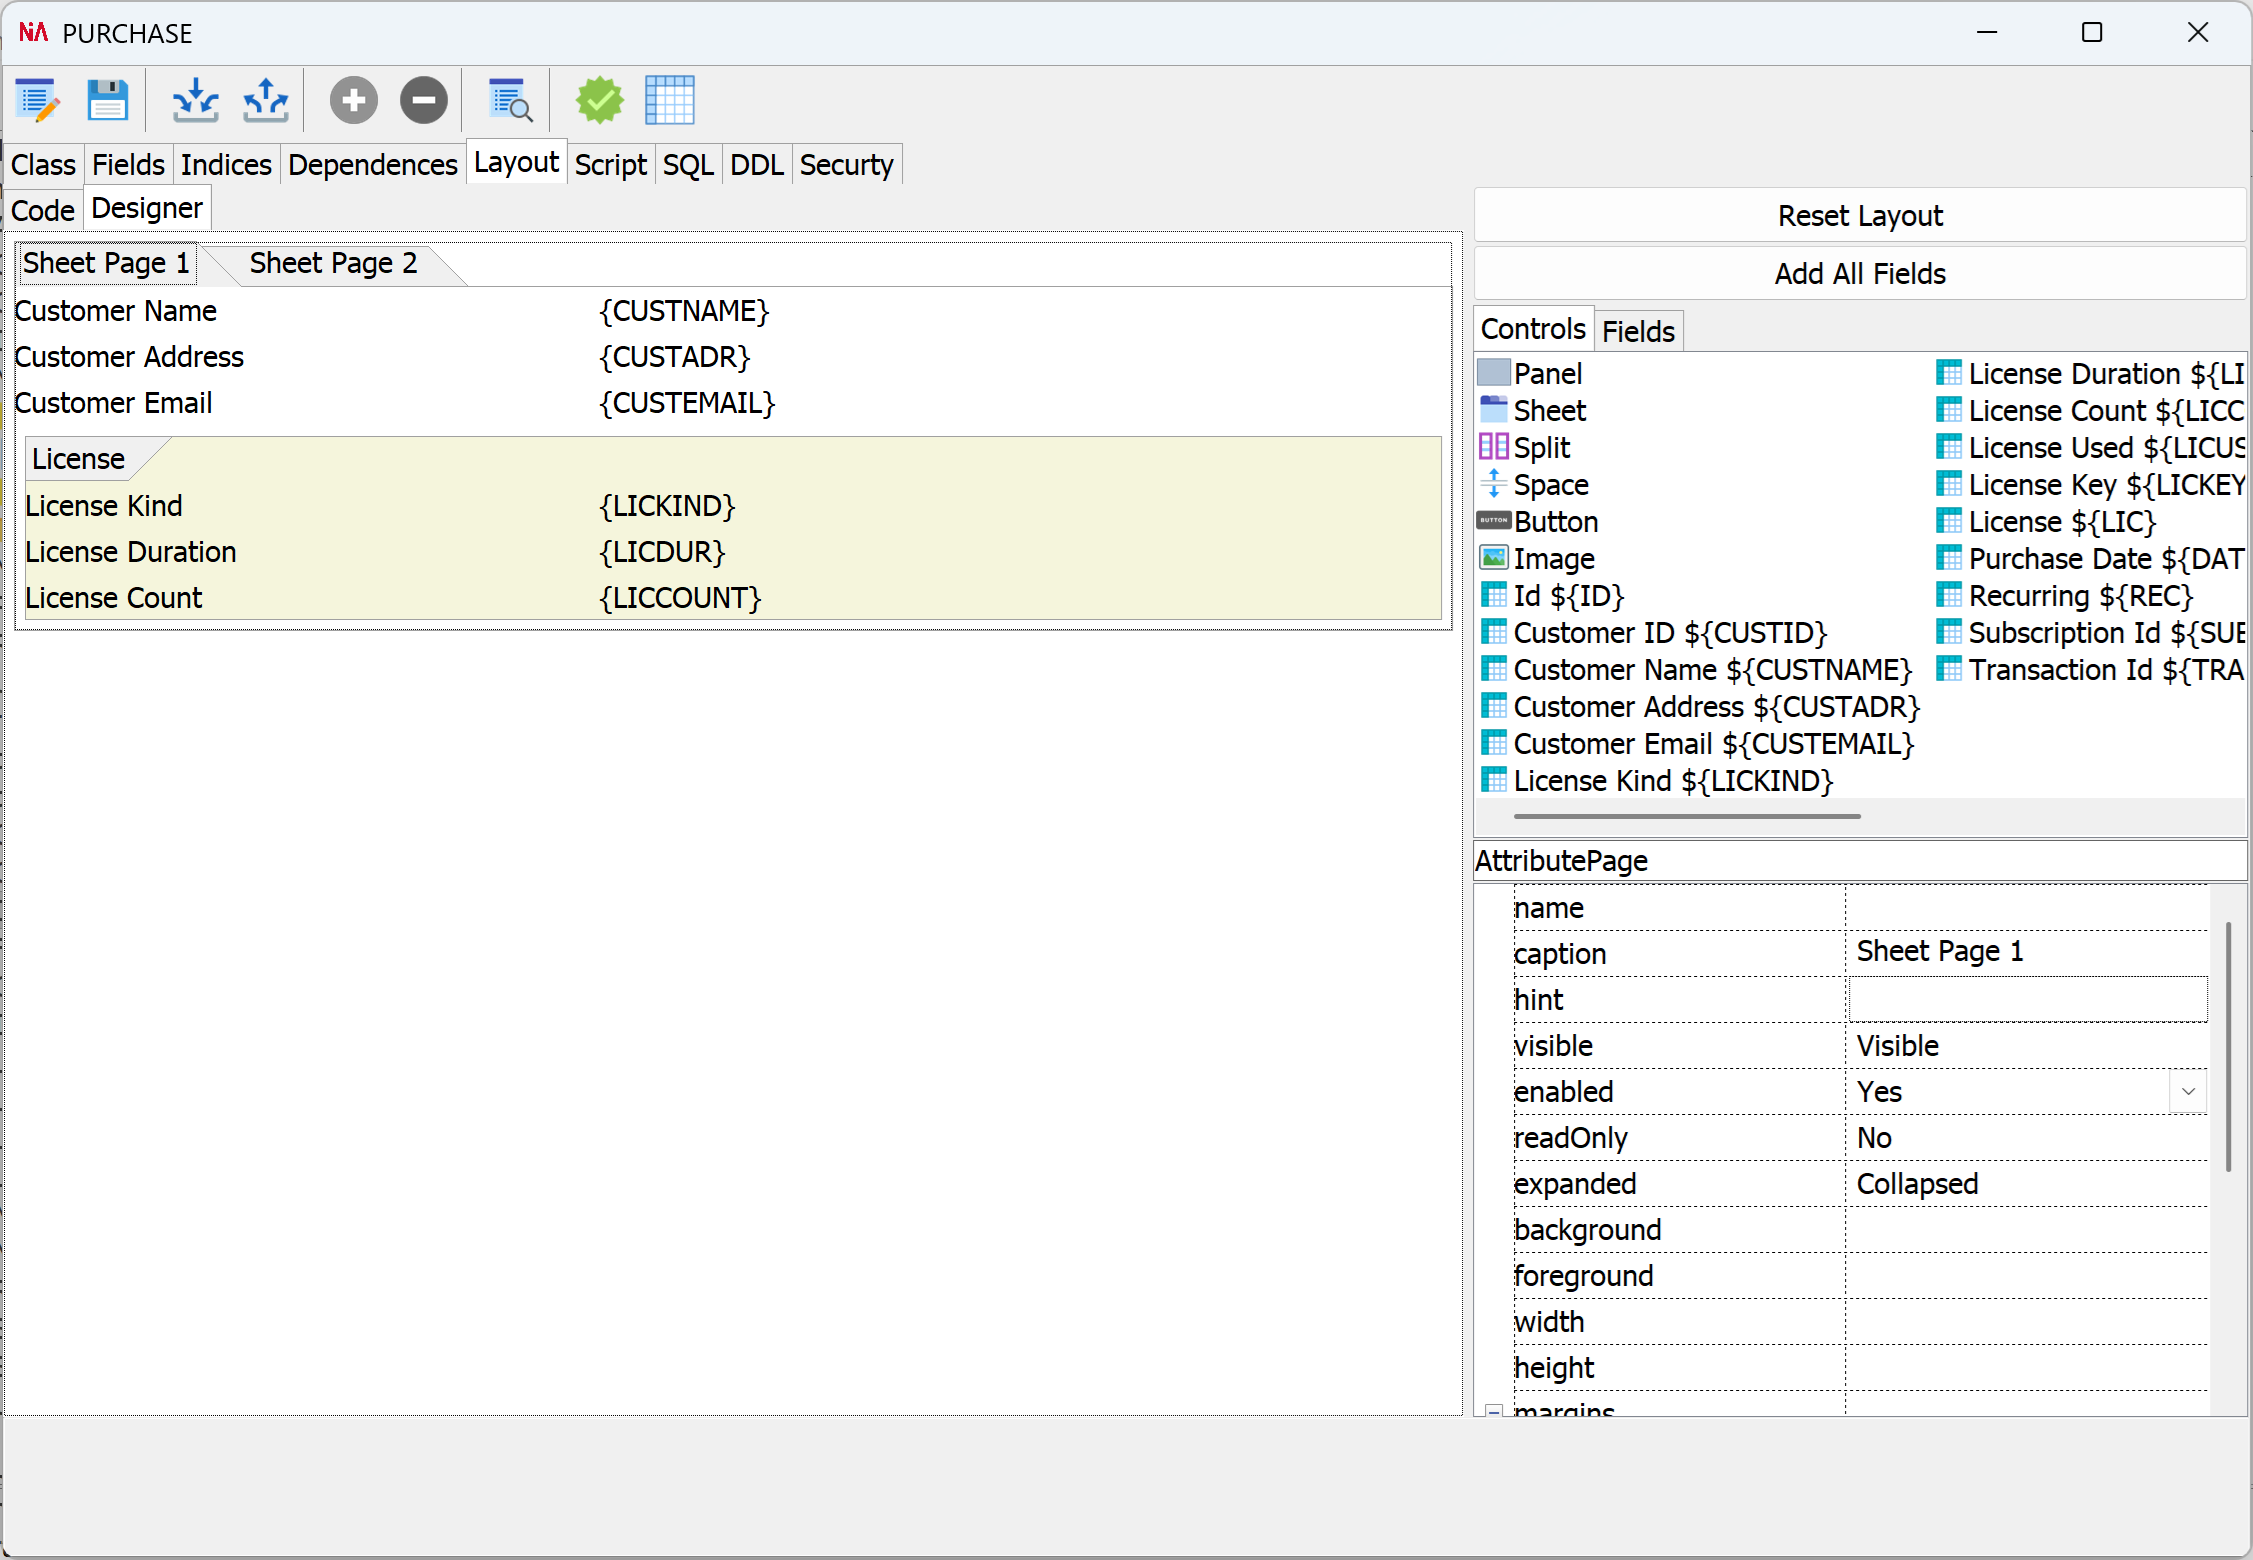
Record with Layout
You can construct very complex layouts and still use a record as source. You must only ensure that your Attribute.name property matches record's field or field name.
this.attributesView.layout = [
        new AttributePanel( { caption: 'Name & Address' }, [
            new Attribute( { name: Purchase.customer } ),
            new Attribute( { name: Purchase.customerAddress } )
        ] ),
        new AttributePanel( { header: false }, [
            new AttributeText( {
                label: L`Some static text you want to display.`,
                font: { size: 8, style: { italic: true } } } ),
            new Attribute( { name: Purchase.purchaseDate } ),
            new Attribute( { name: Purchase.amount })
        ] )
    ];

this.attributesView.source = purchase;
Hint
If you initialize Attribute.name property with a field object like Purchase.customer, it will automatically populate the type, label, defaultValue, values (for lookup fields), formatDisplay, formatEdit, as well as default width and height (if specified) based on the field definition. You can still provide these properties, which will override the default values.
Initialize With Simple Values
Only setting the source property to a certain value can be enough to initialize AttributesView. The control will detect the type of the value and display required editor. Problem starts when your value is undefined or null, because control will not be able to decide which editor to display.
...
this.attributeView.source = 'some text';

// reading changed value is only possible like
var newVal = this.attributeView.focused?.value;
Warning
We highly recommend NOT to use this method, unless you just want to display some values.
Default Data Class Layout
As mentined above, if you just initialize AttributeView.source property only with a record and you don't set fields and layout, AttributeView will use record's data class layout (if defined). Default layout for a data class can be designed using class designer like in the picture below. You can write layout code directly in code editor, or use the designer.
Hint
Please do not confuse this designer with the page layout designer. Both designers have similar available controls, but they are not the same.