Create an App to Query Database
Warning
To write an app, you must login to the Application Center as a developer (member of Developers group).
Launch New App Wizard
Select container (folder) where you want your app to be located. Then call command New Application... from the context menu like in the picture below.
In the first page of the New Application wizard select Query Application or Query Application (With Files) template and press the Next button. Query Application (With Files) is reserved for querying document classes, while Query Application is for querying data classes or when you are not interested in displaying document files.

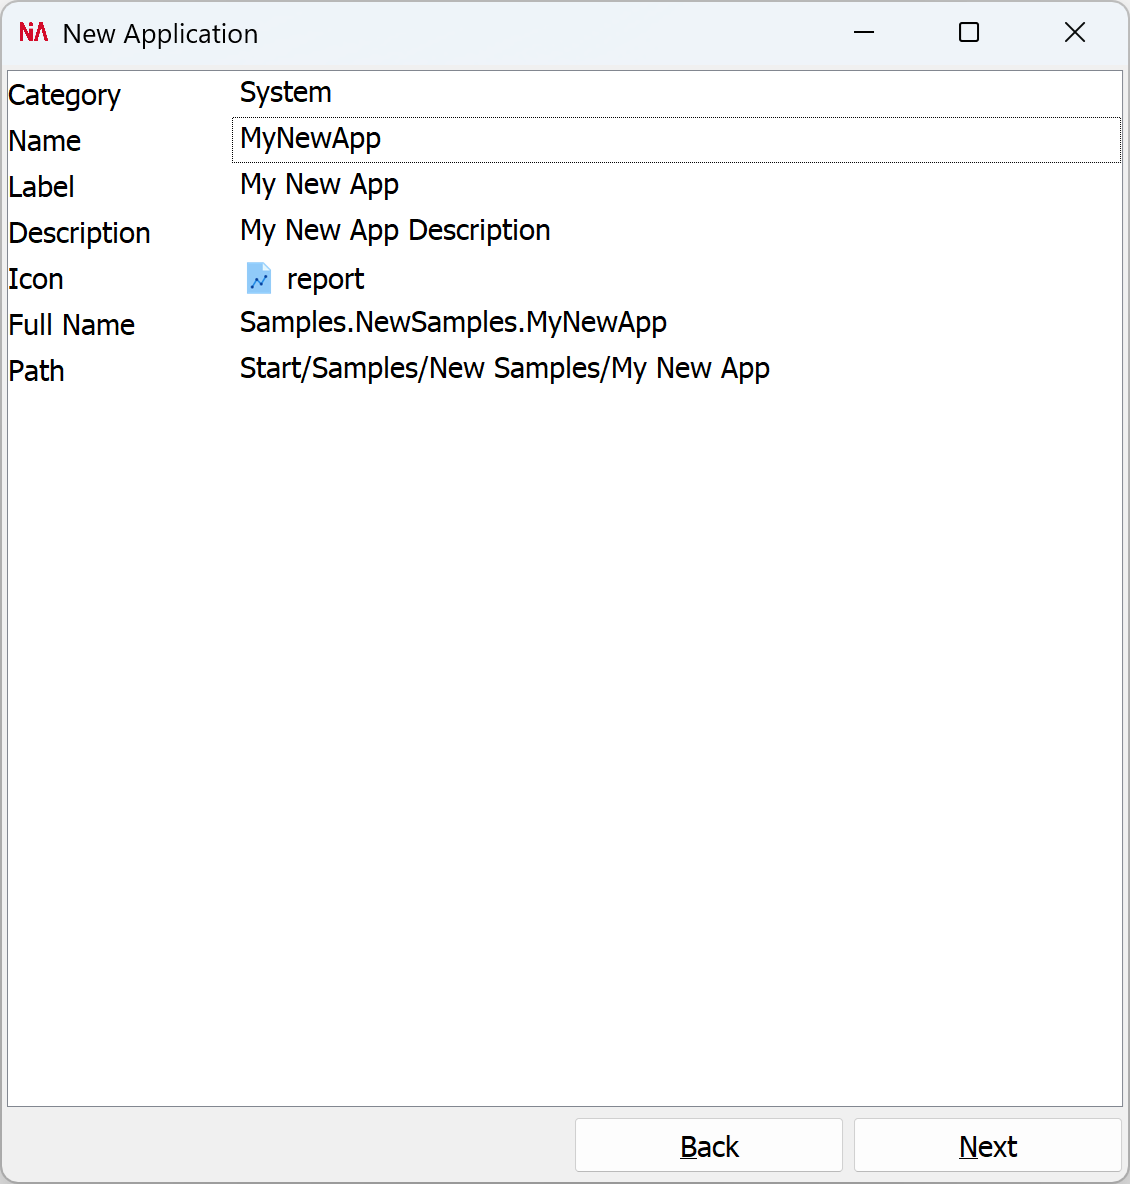
Name, Class and Icon
In the second page of the New Application wizard fill in the required fields like in the picture below and press the Next button.
Warning
App Name must be an alphanumeric text without any spaces or special characters and must start with a letter. This name will be used in JavaScript code to identify application's class.
App Full Name is read only and is made of app's parent container name and this app name. This name will be used in JavaScript code to identify application's module.
You can see here how to use app name and full name to start an app from JavaScript code.
Data/Document Class
In the third page of the New Application wizard select the data/document class you want to query and press the Next button.
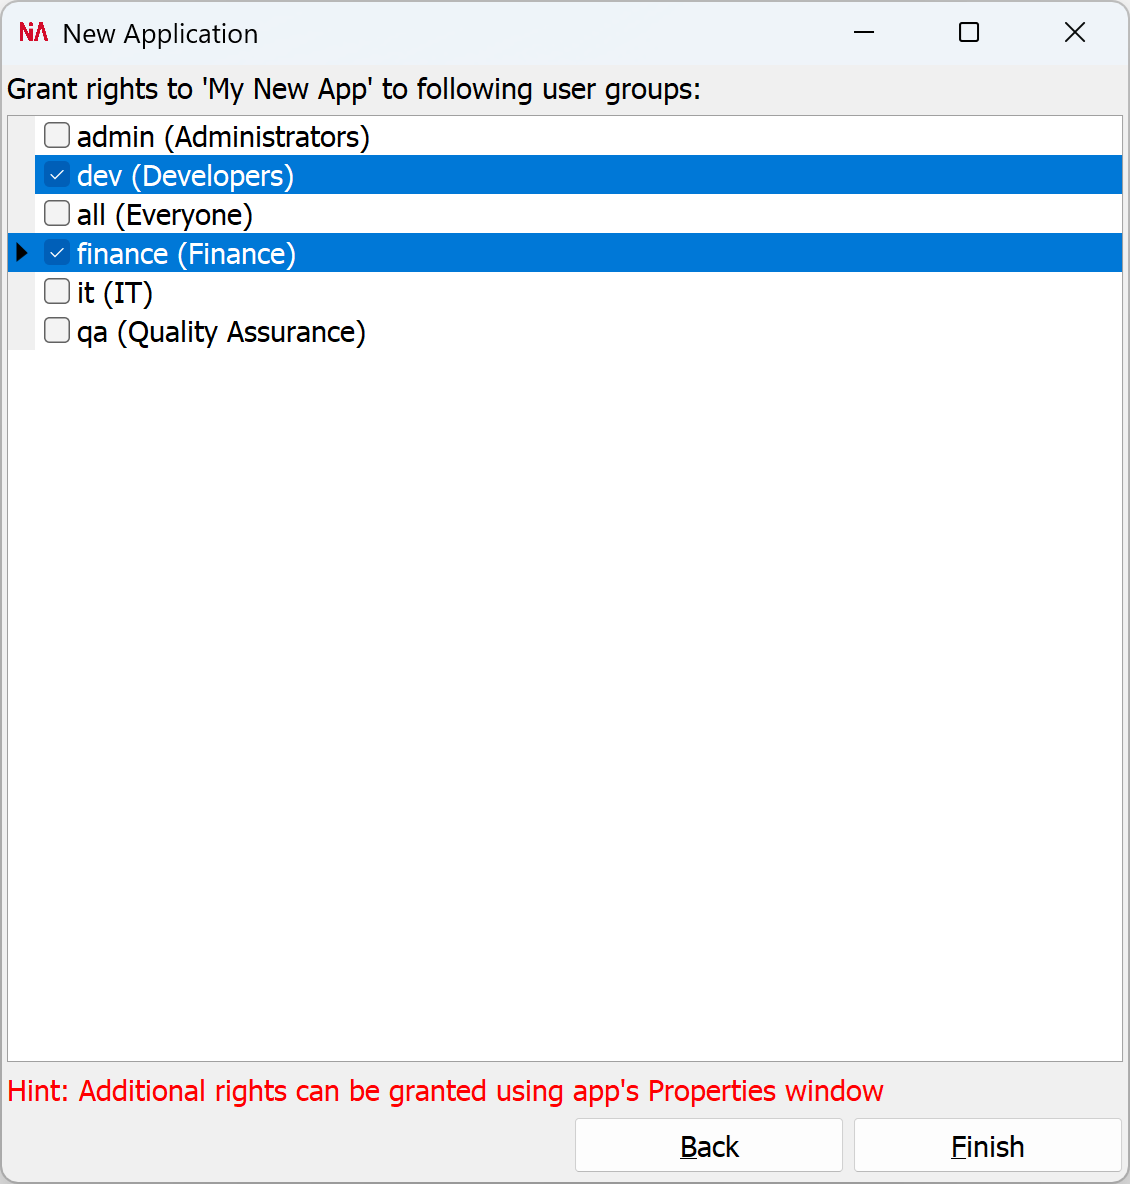
Security
In the forth page of the New Application wizard select which user groups will have the 'execution' right on this app and press the Finish button. Application rights can be also later granted or revoked using app's Properites Window (command Properties... in the context menu in the first picture above).
JavaScript Code
After pressing the Finish button on the last page of the New Application wizard, you will be offered to open your app in Visual Studio Code (or VSCodium).
You can also use context menu commands Open in VS Code or Open in IDE, like in the picture below.
Open in VS Code will open Visual Studio Code or Codium, wich is always the best option for changing the code in NodeActa. VS Code has a sophisticated code editor with auto-complete which simplifies code writing, plus much better and faster debugger.
Open in IDE will open Application Center in Integrated Development Environment (IDE) mode, where you will not be able to execute your apps, but to edit your apps' code instead. We strongly recomend using VS Code instead of build-in IDE. Build-in IDE is good only for small changes when you don't want or you can't install additional software (VS Code or Codium).

Write Your Code
In VS Code, you can modify existing application .js files, create new ones, or delete unwanted.
All the changes you make in VS Code are local and only you are affected by them on your local PC.
If you want other users to see your changes, you will have to uppload them to the server.
To upload the changes run the command command (Ctrl+Shift+P) NodeActa Upload Changes or press Upload Changes button like in the picture below.
Alternatively, you could call Commands→Save All from the main menu in the Application Center.
Also, every time you close Application Center, you will be asked to uppload changed code (of course, if you are logged in as a developer).

Standard apps always have index.mjs file. They can also have any number of other files next to index.mjs or in sub-folders. WEB apps are an exception, as they can have index.html instead.
In the code generated by the New Application wizard, you can see the following things:
- Declared Page with RecordsView and AttributesView. See about app with one Page here.
run()method that implements a query on Purchase document class.
import {Purchase} from "class:Purchase";

export class MyNewApp extends App {
  ...
  constructor() {
      super();

      class Page extends PageView {
            constructor(app) {
                super(app);

                //<LAYOUT DESIGN>
                this.recordsView = new RecordsView(this);
                this.recordsView.align = Align.Client;

                this.splitter = new Splitter(this);
                this.splitter.align = Align.Right;

                this.attributesView = new AttributesView(this);
                this.attributesView.align = Align.Right;
                this.attributesView.width = '30%';
                this.attributesView.options.status = true;
                this.attributesView.options.labelsWidth = '30%';
                this.attributesView.options.readOnly = false;
                this.attributesView.source = this.recordsView;
                //<LAYOUT DESIGN>
            }
      }

      this.page = new Page(this);
  }

  async run() {
        let query = Purchase.query();
        for( let field of Object.getOwnPropertyNames(Purchase) )
            if( Purchase[field] instanceof __Field )
                if( Purchase[field].fieldVisibility.includes(ClassFieldVisibility.Search) )
                    query.or.where(Purchase[field], WhereOperator.Equal, new QueryParameter( Purchase[field].fieldLabel ) );

        this.queryDialog = new DialogView(this);
        this.queryDialog.left = '40%';
        this.queryDialog.top = '25%';
        this.queryDialog.width = '25%';
        this.queryDialog.height = '50%';
        this.queryDialog.caption = 'Search...';
        this.queryMask = new QueryParametersView(this.queryDialog);
        this.queryMask.align = Align.Client;
        this.queryMask.source = query;
        if( await this.queryDialog.showModal( L`Find`, L`Cancel` ) == L`Find` )
        {
            this.page.recordsView.source = await query.selectAsync();
            this.page.recordsView.goToFirst();
        }
        this.queryMask = undefined;
        this.queryDialog = undefined;
    }
...
}
Write Your Query
The first part of run() method queries records from document class 'Purchase'. It looks complicated, but it just enumerates all Purchase class fields with Search flag in its Visibility property (see Default Visibility option in Class Designer). Remember, each document class field can be accessed in javascript like: Purchase.customer, Purchase.purchaseDate, Purchase.amount, etc (where Purchase is the class name). While each Purchase record's value matching those fields can be accessed like: purchase.customer, purchase.purchaseDate, purchase.amount, etc (where purchase is Purchase class instance).
You can also construct a fixed query like:
let purchases = await Purchase.
                    where(Purchase.purchaseDate, WhereOperator.Today).and.
                    where(Purchase.customer, WhereOperator.Equal, new QueryParameter( Purchase.customer )).
                    orderBy(Purchase.purchaseDate, SortOrder.Desc).
                    selectAsync();
The second part of run() method displays a search mask using QueryParametersView in a Dialog (See about app with Dialog here).
You can also show a query parameter in your search mask using a predefined list of possible values like this:
let query = Purchase.
                where(Purchase.stat,
                      WhereOperator.Equal,
                      new QueryParameter( {
                        name: Purchase.stat,
                        values: [
                          new AttributeValue( 0, L`Preordered` ),
                          new AttributeValue( 1, L`Ordered` ),
                          new AttributeValue( 2, L`Paid` )
                        ]
                      } )
                );
Hint
AttributeValue( value, label, icon ) constructor parameters are self-explanatory.
Hint
If that capital L in new AttributeValue( 0, LPreordered) is bothering you, please read about Localization.
A query grouping conditions like this is also possible:
let purchases = await Purchase.
                    where(Purchase.purchaseDate, WhereOperator.Today).and.
                    openBracket.
                        where(Purchase.customer, WhereOperator.Equal, 'NodeActa GmbH').or
                        where(Purchase.customer, WhereOperator.Equal, 'NodeActa LLC').
                    closeBracket.
                    orderBy(Purchase.purchaseDate, SortOrder.Desc).
                    selectAsync();
Toolbars and Menus
Use app's static commands property to customize the Navigation View context menu, and app's commands property to customize the main toolbar and the main menu. Also, each PageView can have its own commands, and whenever that page is shown and active, whey will be displayed in the main menu and toolbar (merged with the existing commands defined in app's commands property). See Command.
get commands() {
    return [ {
        group: L`My Main Menu`,   // <main meny item (default is `Commands`),
        label: L`Command 1`,
        icon: Icons.play,        // one of the icons in the system
        visible: () => ...,      // expression or variable
        enabled: () => ...,      // expression or variable
        checked: () => ...,      // expression or variable
        command: () => { /*do something*/ },
      },
      {
        group: L`My Main Menu`,   // <main meny item (default is `Commands`),
        label: L`Command With Sub-Command`,
        icon: Icons.stop,        // one of the icons in the system
        visible: () => ...,      // expression or variable
        enabled: () => ...,      // expression or variable
        commands: [ {            // list of commands for sub-menu/dropdown button in toolbar
          label: L`Sub-Command`,
          icon: Icons.grantee,
          command: () => { /*do something*/ } } ]
      }  ];
  }
Hint
The initial toolbar, main menu, and navigation view context menu are defined in StartApp. These toolbar buttons and menu items are always present, regardless of whether another app is running or not. Of course, you can change those by modifying JavaScript code of the StartApp itself.